Table of Contents
Experiencing low FPS, stuttering, or input lag even on a decent PC?
You don’t need better hardware; you need better settings.
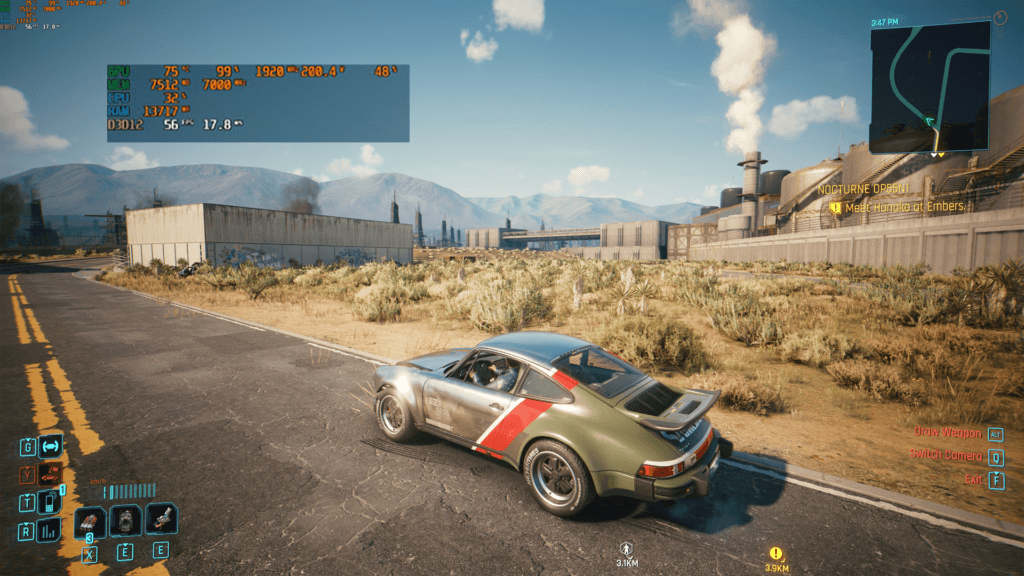
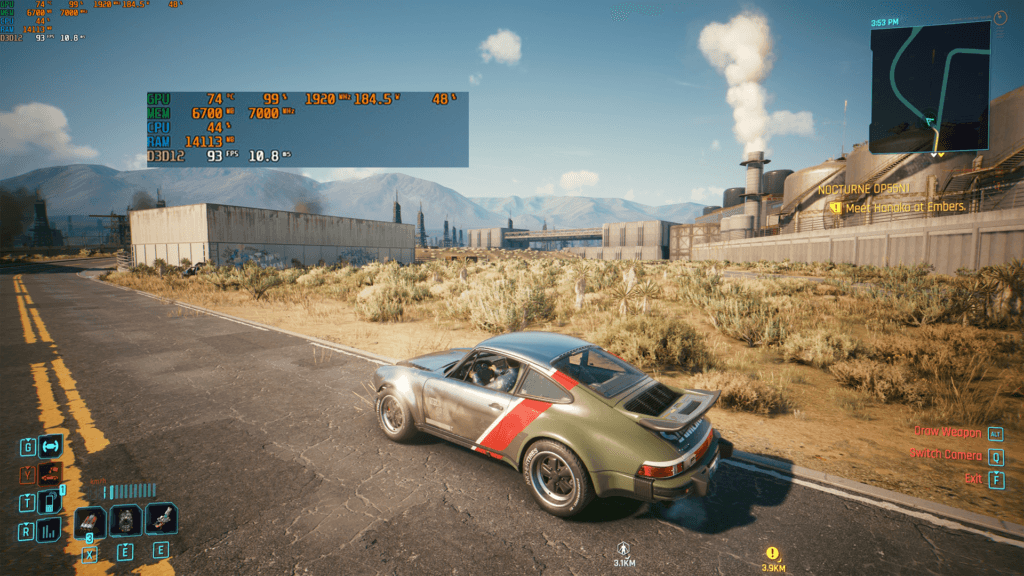
In my own testing, adjusting a single graphical in-game setting increased average performance from around 56 FPS to roughly 93 FPS on my system.
Most performance issues come from incorrect settings, background processes, and outdated drivers, not weak hardware.
In this guide, you’ll learn exactly how to optimize your PC for gaming to boost FPS, reduce input lag, and get smoother gameplay, step by step.
Here’s a real example of how a simple setting change improved performance:
Before:
After:
How to Optimize Your PC for Gaming
Optimizing your PC for gaming isn’t just about boosting FPS; it’s about achieving the right balance between your hardware and the performance, responsiveness, and visual quality of the game.
Many gamers focus on random tweaks or settings without understanding what actually impacts performance.
In this guide, we’ll break down the key factors that affect your gaming experience and show you how to optimize them the right way, starting with how gaming performance really works.
How Gaming Performance Works (FPS, Latency & Stability)
To fully understand this guide, and before diving in and changing in-game settings, optimizing Windows, or applying various tweaks mentioned in this guide, it’s important to understand how PC gaming performance actually works.
What Is FPS & Why Does It Matter?
FPS is a short term for frames per second, which refers to how many frames, or in other words, individual images, your PC renders every second while a game is running.
For example, 60 FPS means your GPU is rendering 60 frames each second, while 120 FPS or 144 FPS means that it is rendering 120 and 144 frames per second, respectively. 120 and 144 FPS are only noticeable on high-refresh-rate monitors.
Most movies are capped at 24 frames per second, but in video games, you can go as far as your setup handles.
High FPS means smooth gameplay, responsive motions, and enjoyable experiences, while low FPS means unresponsive gameplay, delayed input, and frustrating yet unplayable experiences.
However, High FPS is great, but that alone doesn’t always guarantee consistent and stutter-free gameplay. Instead, you should always aim for stable FPS counts because it is often more important than focusing solely on achieving the highest frame rates.
Frequent FPS drops always create stutter and disrupt your overall experience. A rule of thumb is that low but steady FPS counts are more enjoyable than high but stuttered FPS counts.
This is why this optimization guide focuses on maintaining a steady frame time, not only on increasing FPS. We will do that by balancing your in-game resolution, graphical settings, updating your drivers, tweaking your Windows OS, etc.
What Causes Lag, Stutter, and Input Delay?
To be straightforward, there isn’t one cause behind in-game stutters, delays, and lag.
A combination of factors is responsible for those performance issues, including your GPU, CPU, RAM, storage, etc.
GPU bottleneck (Weak GPU)
The most important factor when it comes to video games is your GPU, which alone handles rendering every frame to be displayed on your monitor.
Even with a decent CPU, if your graphics card can’t keep up with the resolution and in-game settings you’ve chosen, it creates a GPU bottleneck that causes lag, stutter, and input delays.
In this specific case, your GPU struggles to render enough FPS, which usually results in low and unstable FPS, therefore leading to stutter and laggy gameplay.
Choosing the wrong resolution for your specific GPU, applying GPU-intensive ray tracing technologies, and maxing out every graphical setting, etc, can overwhelm almost every mid-range GPU.
CPU Limitations (Weak CPU)
Your CPU and GPU work together to generate and render in-game FPS. The CPU has fewer cores compared to the GPU, but it still handles most of the heavy work.
In gaming, it manages draw calls, video game logic, physics for players and NPCs, various AI aspects, and more.
When the CPU can’t keep up with the game, it can’t feed the data required by the GPU, which will later be translated into game frames, resulting in unbearable lag, random stutter, and high input delays.
RAM and Storage
Insufficient RAM will certainly lead to performance issues in modern video games. In this specific case, your PC tries to swap data to slower storage, HDD or SSD, to create some space for the CPU instructions and files.
The catch is that RAM is extremely fast, tens and thousands of times faster than the fastest modern storage drive solutions, NVMe gen 5, for this specific point in time.
Storage drives aren’t designed to transfer data as quickly as system memory (RAM), which is why relying on storage instead of RAM can cause in-game unexpected freezing, stutters, and noticeable lag.
Another aspect that impacts in-game performance is the storage itself; HDDs can lead to long loading times, especially on modern, enormous video games that require SSDs that are able to fetch in-game assets and files quickly.
HDDs may also lead to texture pop-ins, stutter during gameplay sessions, etc.
Background Processes & Thermal Throttling
If you have 8 GB of RAM or less, the chances are that your installed apps running in the background, such as browser tabs you keep opened, Discord, Steam, etc., consume CPU and memory resources, which results in in-game high input delay, frame drops, or inconsistent FPS.
CPUs or GPUs automatically reduce their clock speeds when they overheat to prevent permanent hardware damage. This safety measure is called thermal throttling. When it occurs, it causes sudden drops in FPS and stutter during gameplay.
You should always monitor your system’s temperatures to prevent throttling-related performance issues. You can learn how to stop CPU overheating before it’s too late in this post.
Network Latency (for Online Games)
For multiplayer games, lag isn’t always caused by your PC. High ping or unstable connections create delayed inputs and rubberbanding. OS, Hardware, and in-game optimization won’t fix network issues.
Update Everything That Affects Gaming Performance
Keeping your PC updated is the most overlooked step when you try optimizing your PC for gaming. Hardware and software updates are a simple solution to improve performance, fix bugs, enhance stability, etc.
Update Graphics Drivers (For Nvidia & AMD)
NVIDIA and AMD always release game-ready drivers optimized for newly released titles; those drivers improve performance and directly impact in-game FPS, and overall game stability.
As a best practice, always install the latest stable driver version (WHQL) from your GPU manufacturer, whether it`s Nvidia or AMD, and avoid downloading beta drivers.
Next, we will go into detail on how to update them the right way, step by step.
How to Update Your Graphics Card Drivers (The Right Way)
I’ll cover Nvidia since I have an RTX 2080, but I’ll briefly mention AMD as well.
- Step 1: Download the Latest Drivers
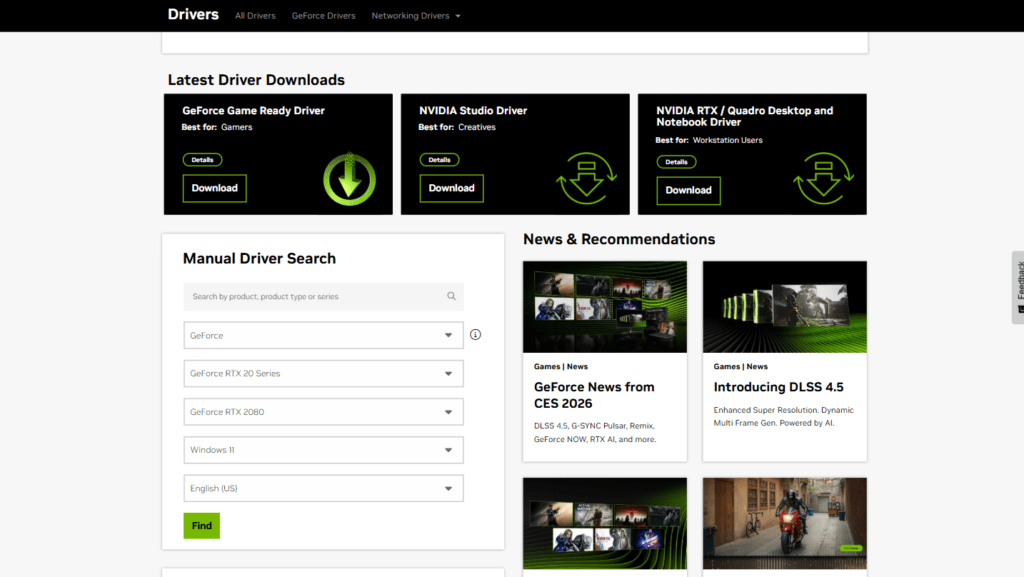
Go to the official websites of Nvidia and AMD and download the latest stable driver for your GPU:
NVIDIA – GeForce Game Ready Driver
AMD – Adrenalin Edition Driver
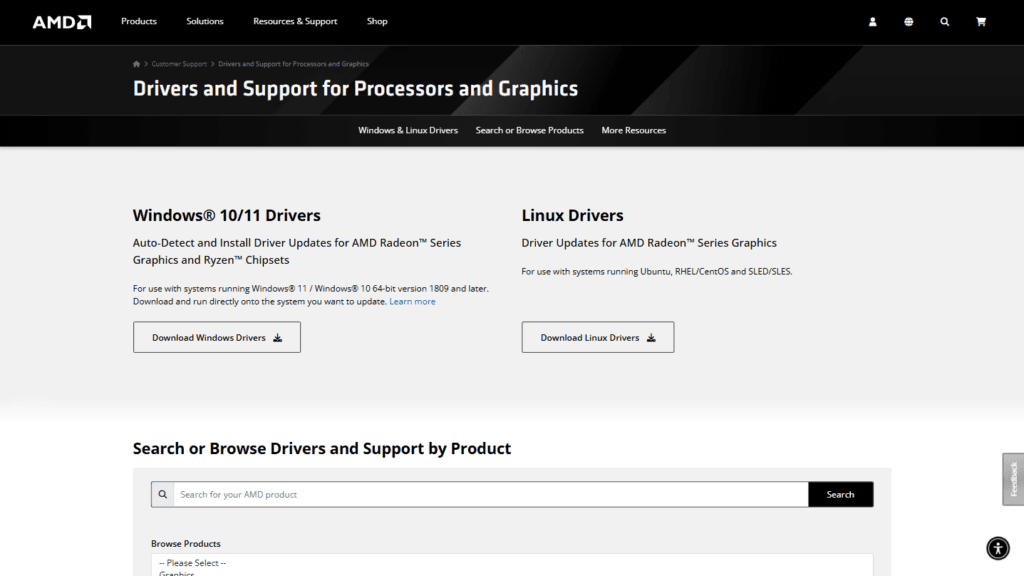
Manually search for your GPU and click on “Find” for Nvidia’s products or “Search” for AMD’s products.
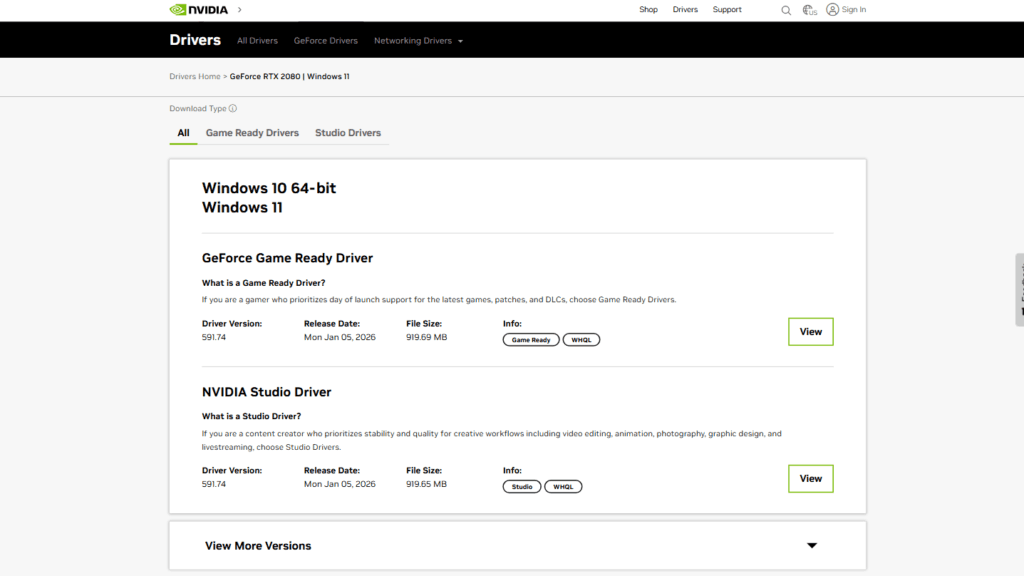
Next, choose between the Nvidia GeForce Game Ready Driver and the Nvidia Studio Driver.
Game-ready drivers target gamers as they always prioritize major video games released and provide launch-day support, patches, and overall performance and gameplay stability.
Studio drivers target content creators regardless of what they are: video editors, animators, photographers, graphic designers, live-streamers, etc. You name it!
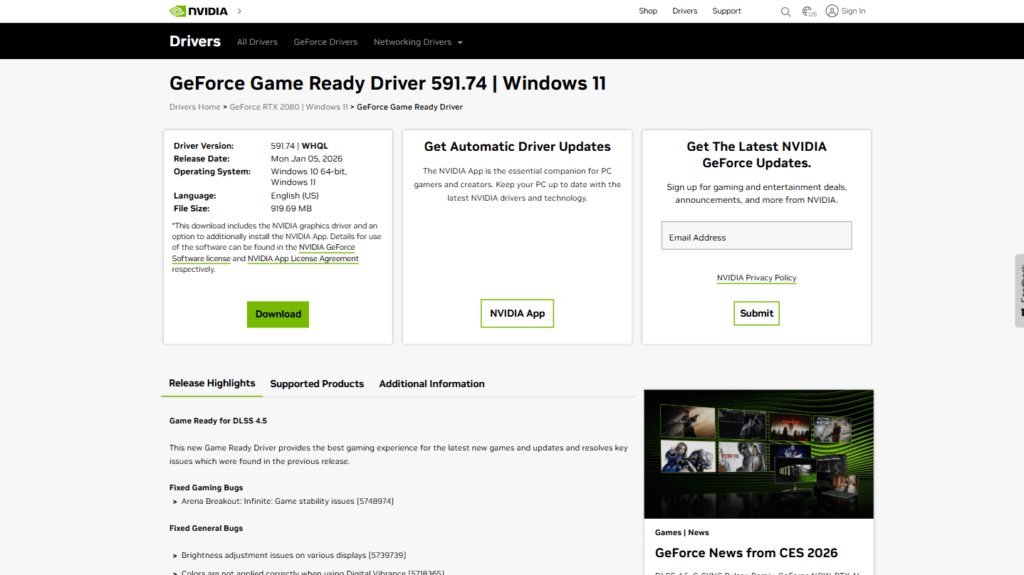
When you choose the type of driver you want, the website will show the latest available driver for you to download. I chose the GeForce Game Ready drivers for Windows 11.
As you can see, the latest driver version is 591.74 / WHQL and supports both Windows 10 and 11. It was released on January 05, 2026.
- Step 2: Use the Built-In Clean Install Option (Recommended for Most Users)
For NVIDIA GPUs
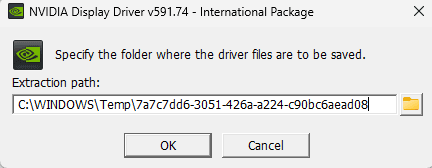
First, run the NVIDIA driver installer; it will ask you to provide a path for the driver to be extracted and saved. Leave it as it is and click on “OK.”
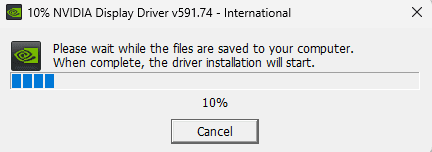
Next, you will see that the Nvidia display driver is being saved to your computer. Once it’s done, you will see an Nvidia installer window as shown below.
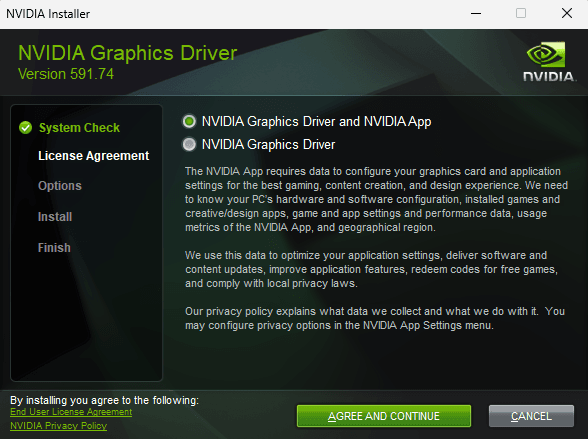
Now, you must agree to the licence agreement and choose either to install the driver alone or to include the new Nvidia App, which is a hub for all Nvidia-related stuff, auto-updating drivers, changing in-game settings, and redeeming prizes, etc.
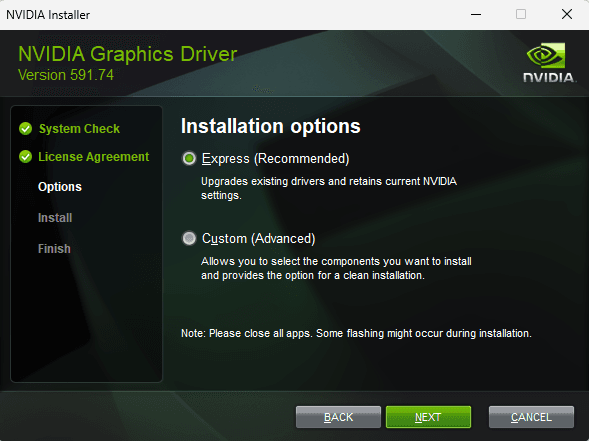
Next, choose the Custom (Advanced) install option to be able to do a clean install.
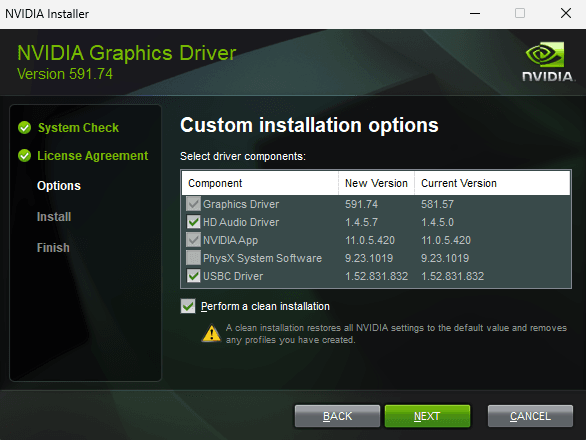
Next, check the option that says “perform a clean installation” to restore all Nvidia app settings to their default value and delete any profiles you created earlier. Once you do that, click on “Next” and let the installation finish.
You may experience some flashing or a black screen for short periods of time. Don’t worry, that’s completely normal as the installation removes your oldest driver and installs a new one.
It’s done now, you have the latest drivers on your Windows machine, and you are ready to play your favorite video games.
For AMD GPUs
For AMD GPUs, open the AMD Adrenalin software, navigate to Settings → System, and select Factory Reset.
After the reset, reboot your PC and install the latest driver. This process fully restores the driver to default settings and clears cached data, helping to resolve performance issues and ensure stable gameplay.
Update Windows 11
Updating your Windows copy, besides updating your GPU drivers, is a smart, effective, and crucial step to optimize your PC for gaming.
In a cybersecurity scope, updating your OS is far more important than keeping your antivirus updated, and field studies confirm that.
Windows updates don’t just secure your OS, they also enhance your system’s stability, fix performance bugs, and include important libraries such as DirectX, the graphics api made by Microsoft, which games rely on for graphics and audio.
How to Update Your Windows OS (The Right Way)
To update Windows, you need to open the Settings app first by pressing “Win + I” on your keyboard and going to Update & Security → Windows Update.
You can still search for “Check for updates” in the search bar, and that will take you straight to Windows Updates.
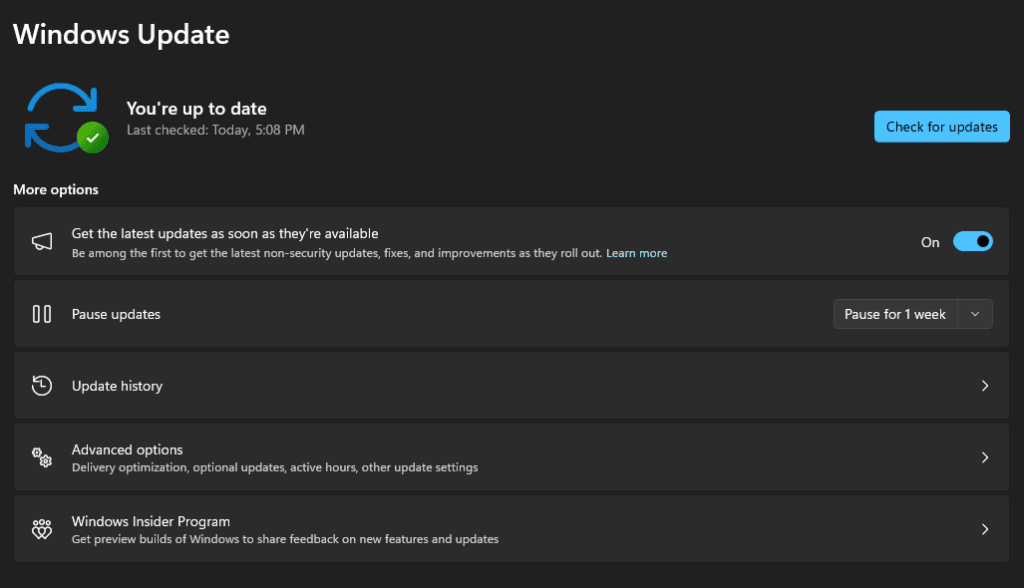
Then click “Check for updates” and allow Windows to download and install any available updates. Once the updates are installed, restart your PC if prompted to complete the process.
Update Your Motherboard’s Drivers (BIOS, Chipset, etc.)
Every motherboard, regardless of its manufacturer, has an official website where you can find the latest driver versions of various components, including its chipset, network controller, audio drivers, and BIOS firmware.
These updates are specifically tailored for each motherboard model released by a manufacturer such as MSI or Gigabyte to help ensure proper hardware communication, improved stability, and better overall system performance.
All drivers can usually be installed like normal software inside your OS, except for the BIOS update. If a specific one addresses an issue you are struggling with, ensure your PC is stable and avoid interrupting the update process.
A failed BIOS update can make your PC unbootable. In some cases, the motherboard can be recovered; however, in worst-case scenarios, you may need to replace your motherboard.
Update Your Video Games
Most video games update automatically before launching them via Steam or any other launcher. Keeping your games updated is an effective way to improve performance and stability, fix bugs, etc.
Sometimes, even an incomplete shader compilation within a game can affect the in-game frames per second. This is why you should always allow shader compilation to finish before benchmarking or judging performance.
How to Optimize Windows for Gaming
Sometimes, configuring your Windows copy the right way plays a critical role in how games utilize your hardware.
Misconfigured system settings, too many apps installed you didn’t use in a while, intensive background services, or even bad power management configurations can limit your CPU and GPU performance.
They may also increase your input latency, cause inconsistent frame pacing, and lead to random FPS drops. That is why optimizing your Windows can make your system prioritize your resources for gaming over unnecessary background tasks.
Enable Game Mode
Windows Game Mode is designed to give high-priority access to your system resources for your video games by limiting background activity, Windows updates, Windows notifications, etc.
That way, your system is allocating almost all of your available resources to your game.
How to Enable Game Mode on Windows 11?
To enable game mode on Windows 11. First, you need to open the Settings app by pressing “Win + I” on your keyboard and going to Gaming → Game Mode.
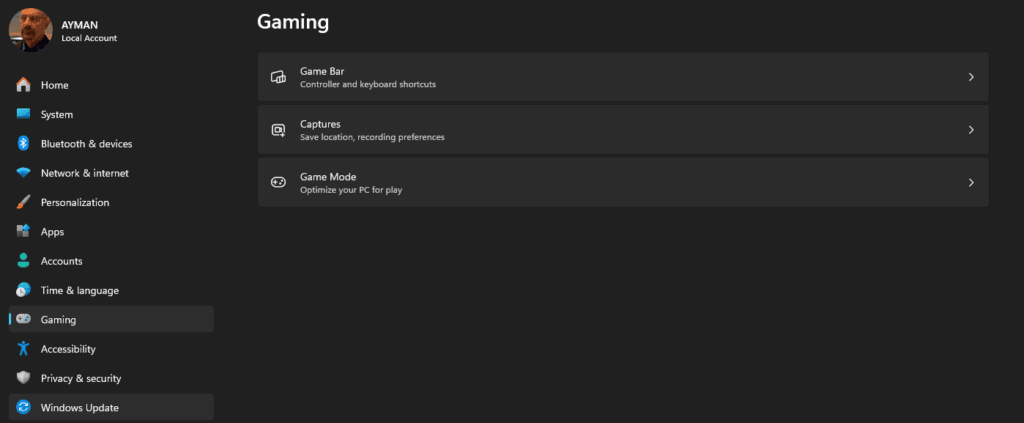
You can search for “Game mode settings” in the Windows 11 search bar to go directly to the settings you are looking for.
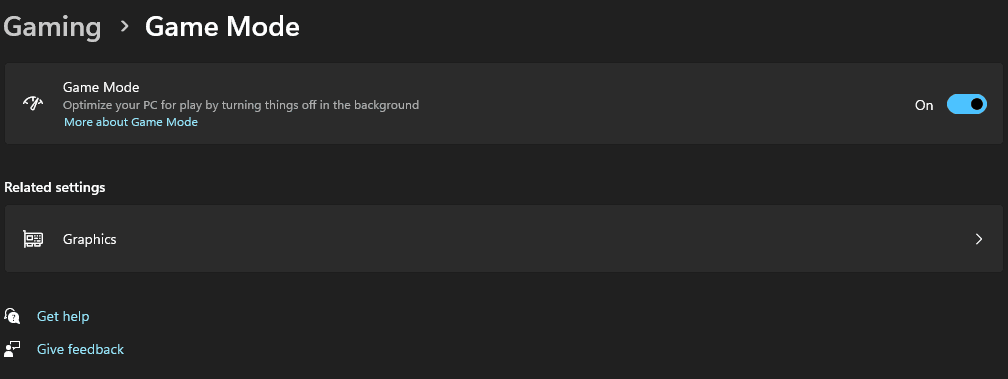
Now, all you need to do is turn on the only setting that you see, which is “Game Mode”. It’s demonstrated in the screenshot above.
Set Power Plan to High Performance
Your power plan settings may cause the CPU and GPU to downclock during your gaming sessions, which will, of course, reduce in-game performance.
You should always avoid setting your system’s power plan to “Balanced” or “Power-saving” while gaming and instead select “High Performance” or even select “Ultimate Performance” power plan if you have a decent, powerful PC.
How to Set Power Plan to “High Performance” or “Ultimate Performance”?
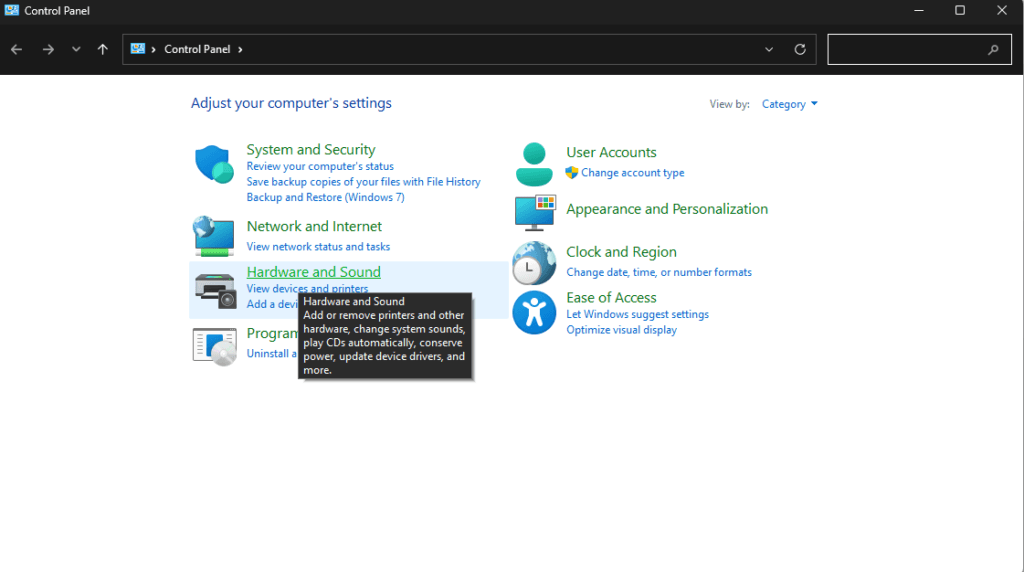
To change your power plan, click the search icon on the taskbar and search for Control Panel.
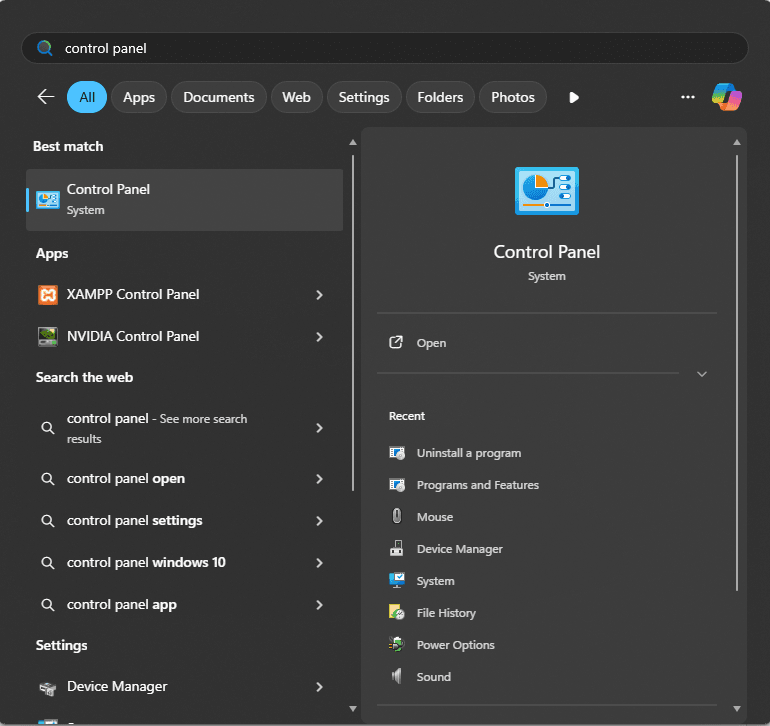
Open it, then navigate to Hardware and Sound.
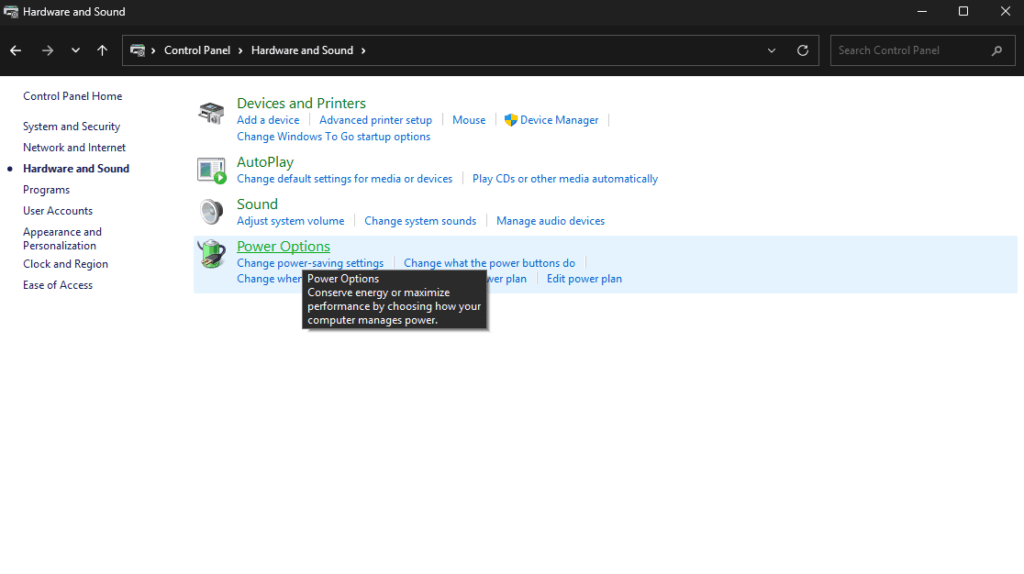
Once you are inside, choose “Power Options”.
Finally, select High Performance.
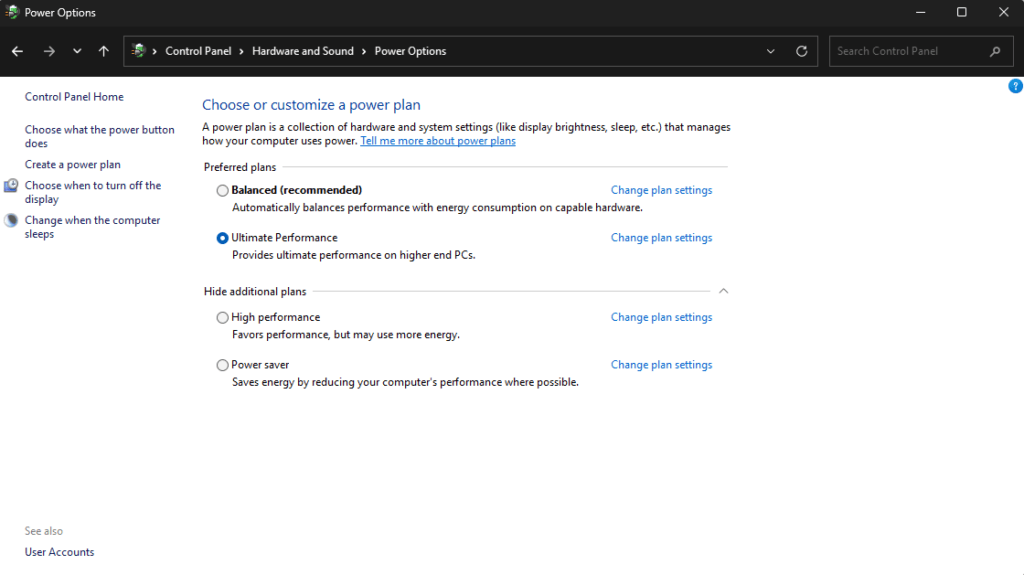
This plan prevents unnecessary power saving and allows the CPU and GPU to maintain higher clock speeds during gameplay.
On some systems, you may also see the “Ultimate Performance” plan, which will further reduce the power-saving features, limiting your hardware, and is mainly available on high-end desktops or workstations.
For laptops, always make sure the device is plugged in when you play, as power plans may still limit performance on laptop batteries, regardless of the selected option.
Please note that “High Performance” and “Ultimate Performance” power plans increase power consumption and heat output, so make sure your cooling solution can effectively dissipate that, especially on gaming laptops.
Turn Off Visual Effects You Don’t Need
On low-end PCs, turning off visual effects that you don’t need can help improve in-game responsiveness and reduce minor random stutters.
Windows animations, transparency effects, and shadows allocate some GPU resources and can slightly increase CPU and GPU workload.
How to Turn Off Visual Effects on Windows 11?
To access Windows visual effects settings, click the search icon on the taskbar and search for “Adjust the appearance and performance of Windows.”
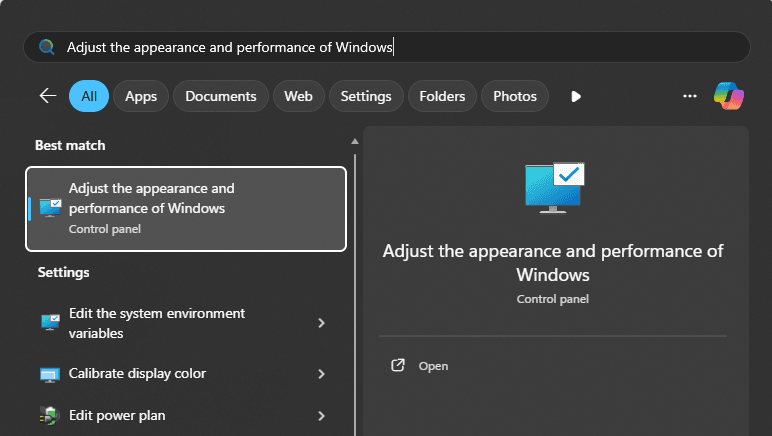
Open it, and you’ll be taken to the Performance Options window.
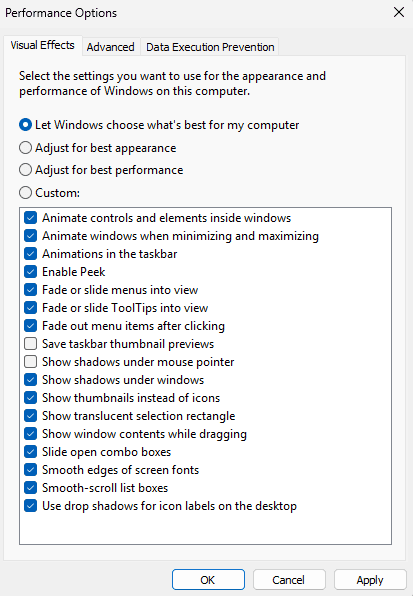
From there, manually change the “Let Windows choose what’s best for my computer” to “Adjust for best performance”.
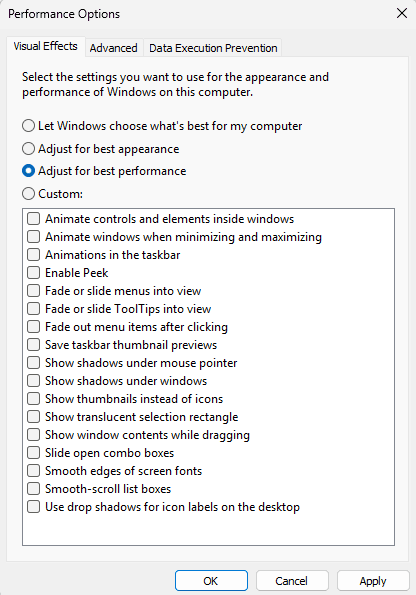
Finally, click on “Apply” and “OK”. This is a small trick to take advantage of if you have a low-end PC.
Keep Windows Clean and Stable
To keep your Windows copy clean and stable, you need to make sure that you avoid installing too many applications that you rarely use and regularly uninstall unused programs.
By doing that, you are automatically minimizing background apps and startup processes without going and disabling them manually, a method we will see later in this post.
Also, avoid installing “Too good to be true apps”, which promise instant PC optimizations and boosts. These programs make exaggerated claims and often compromise your system’s security, doing more harm than good.
Those apps sometimes identify as system cleaners, FPS boosters, registry cleaners, or debloat scripts.
Disable Unnecessary Startup Apps
Startup applications are programs that launch automatically when Windows boots. Most of them run silently while consuming CPU resources, memory, and disk drive activity, etc, in the background, resources that are valuable and could otherwise be used by your games.
If you have a lot of programs and you are certain that you need them all. Don’t uninstall them; instead, disable unnecessary startup apps, those you don’t need to run automatically as Windows boots. You can run them manually whenever you want.
By doing that, you help your PC to reduce background CPU load, improve system responsiveness, and keep enough RAM for your video games.
How to Disable Unnecessary Startup Apps
To manage your startup apps and make sure that your PC can boot as fast as it can, and free up resources. First, press “Ctrl + Alt + Delete” and select “Task Manager.”
You can achieve the same thing by right-clicking on your Windows taskbar and selecting “Task Manager.”
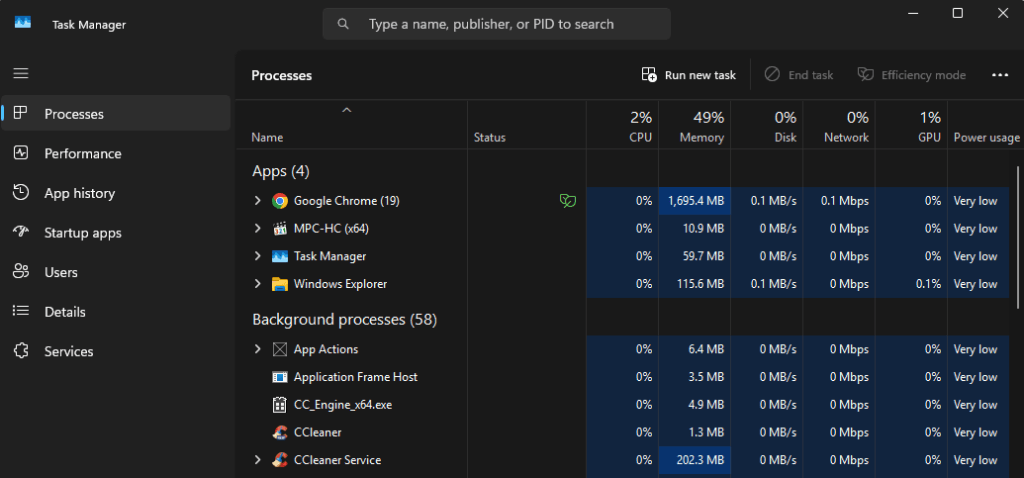
When “Task Manager” is opened, you need to navigate from “ Processes” to “ Startup apps.”
From here, you can disable any applications you don’t need running all the time, such as game launchers, updaters, background “resource-hungry” utilities, etc.
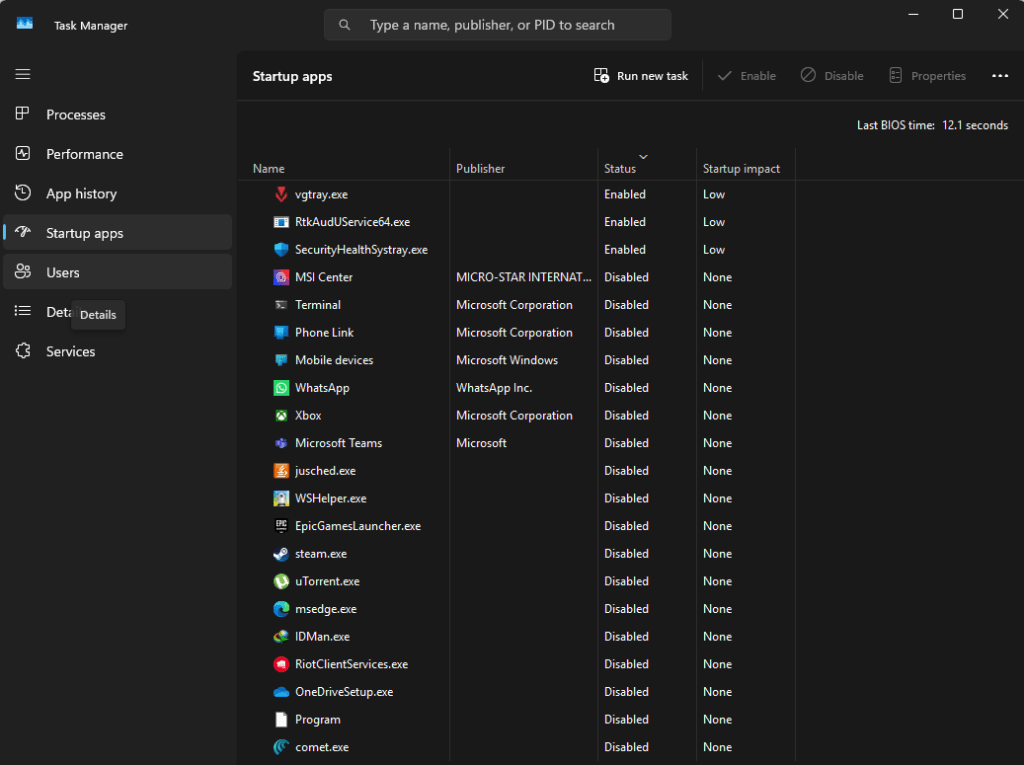
Pay close attention and see that I’ve disabled almost all of my unnecessary programs, except for “vgtray.exe,” which is a low-level anti-cheat system for Valorant, SecurityHealthSystray.exe, which is the Windows security app, and RtkAudUService64.exe, which is my Realtek Audio driver app.
How to Optimize Nvidia Control Panel Settings
NVIDIA Control Panel is an app developed by NVIDIA for those who have NVIDIA GPUs. It’s considered a hub for your GPU to manage and fine-tune graphics and performance settings.
Optimizing its overlooked settings may help improve FPS consistency, reduce input lag, ensure that you use all of your GPU’s features, and keep it running efficiently.
I won’t focus on settings that you will find inside the in-game graphical settings, like texture settings, v-sync, and antialiasing; instead, I’ll focus on those you won’t find elsewhere.
Power Management Mode
One of the most overlooked yet important settings within the Nvidia Control Panel is the power management mode.
Choosing the “Prefer Maximum Performance” option ensures that your GPU runs at higher clock speeds during your gaming sessions instead of downclocking to save power.
Saving power is an important aspect for laptop users. Finding the right balance between power consumption and performance is in their best interest. Desktop users don’t worry about that too much.
Tweaking this setting helps prevent sudden FPS drops and improves overall consistency, particularly in GPU-intensive video game titles.
How to Tweak Power Management Mode
On your desktop, right-click on your mouse and select “Nvidia Control Panel.”
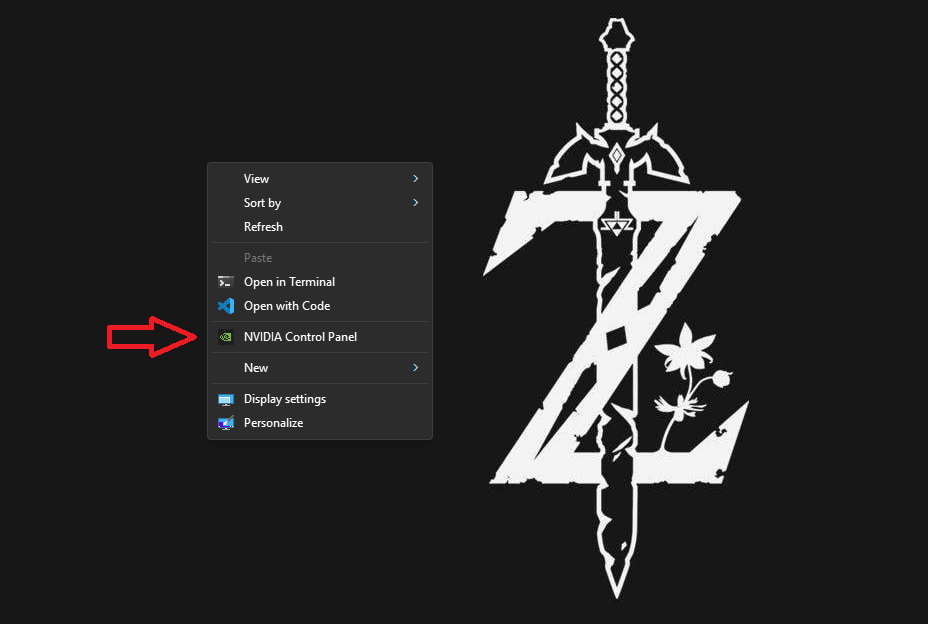
Once you are inside it, you will see something like this:
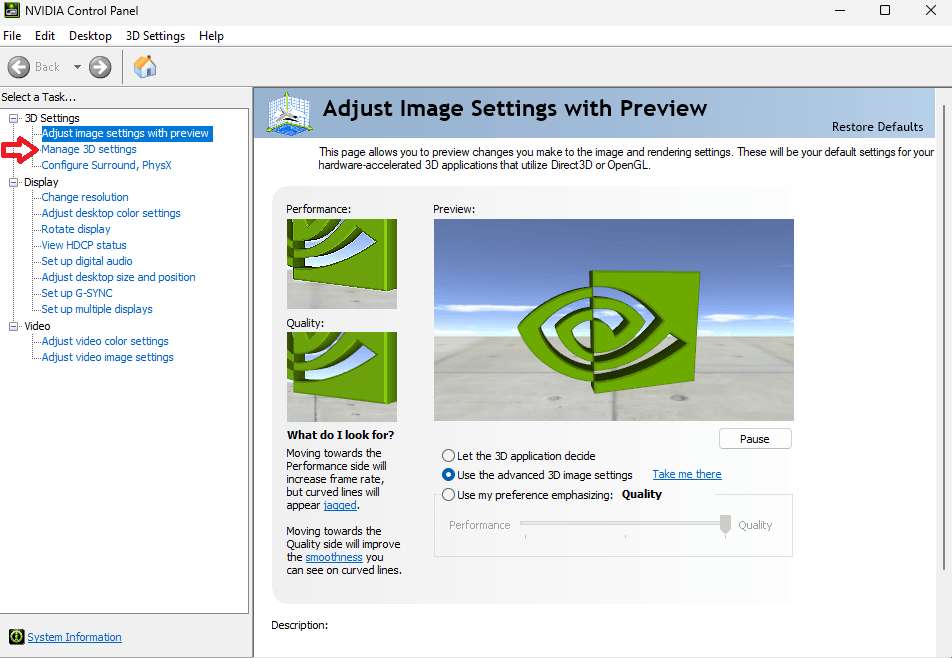
Next, navigate to “Manage 3D settings,” indicated by a small arrow at the left.
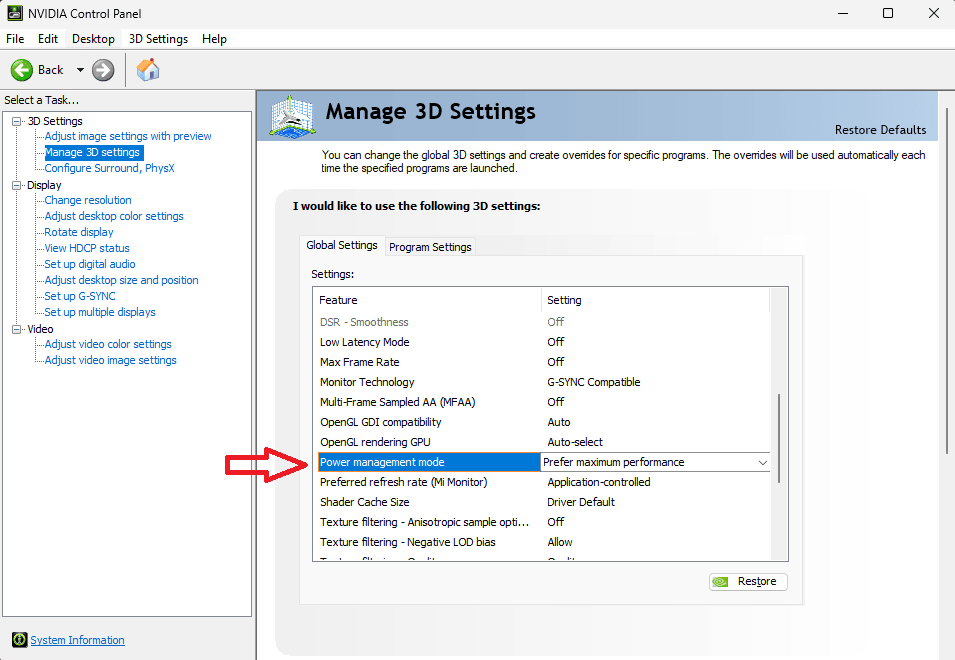
On your right, you will see a list of global settings predefined on your Nvidia Control Panel. Scroll down until you see the “Power Management Mode” setting.
It comes with the “Optimal Power” setting as a default one. Now you must switch it to “Prefer maximum performance” and click on “Apply.”
Finally, you’ve successfully ensured that your GPU will perform at its best at all times.
Low Latency Mode
Multiplayer games will thank you, because enabling this setting reduces the delay between your inputs (keyboard and mouse) and what happens on-screen, which is measured in milliseconds.
Low Latency Mode works by limiting how many frames the CPU prepares before the GPU renders them, but it may slightly reduce maximum FPS.
Note that this is different from NVIDIA Reflex technology, which is a separate system designed to further reduce latency in supported games.
How to Enable Low Latency Mode
On your desktop, right-click on your mouse and select “Nvidia Control Panel.”
Navigate to “Manage 3D settings,” and you will see a setting called “Low Latency Mode.”
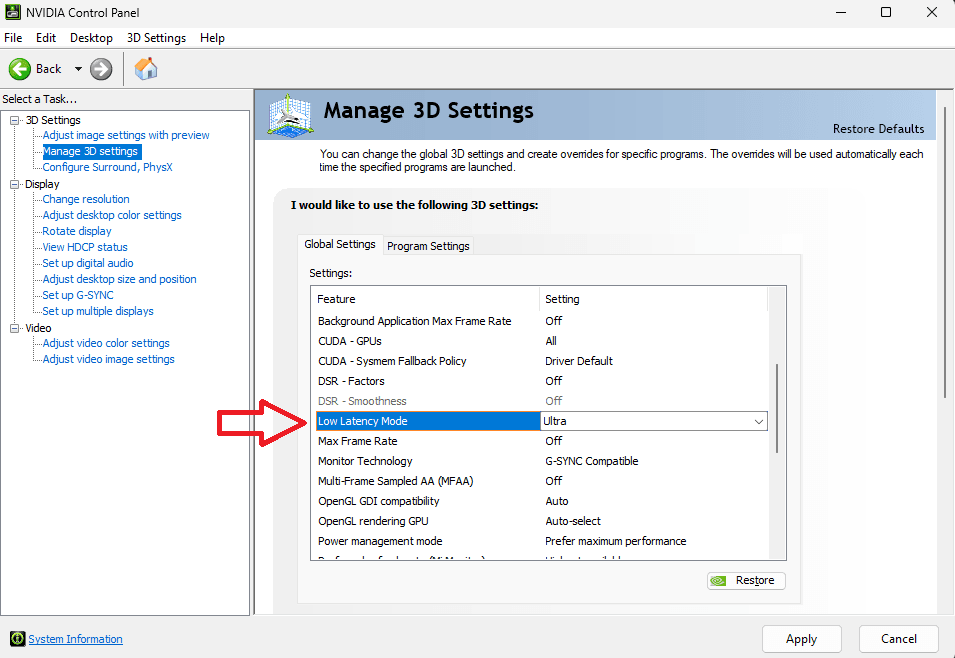
Now, enable it by switching the default setting from Off to either On, which reduces the number of pre-rendered frames and improves responsiveness in multiplayer games, or Ultra, which substantially limits pre-rendered frames for the lowest possible input lag.
Set up G-SYNC & Monitor Technology
G-SYNC and FreeSync are variable refresh rate technologies developed by Nvidia and AMD, respectively.
It’s a new technology that was born after v-sync, and its downsides, both of which came to solve real problems, which are screen tearing and stuttering caused by an unsynchronized monitor’s refresh rate with real-time in-game frames.
To understand how v-sync works, its limitations, and when it should or shouldn’t be enabled, we cover it in depth in a dedicated v-sync guide, which you can visit here.
Both G-SYNC and FreeSync are now cross-compatible, which means if you have a FreeSync-compatible monitor, you can use G-SYNC.
Today, both technologies are based on the VESA Adaptive Sync standard, which is why variable refresh rate support is now referred to as Adaptive Sync by monitor manufacturers.
How to Set up G-SYNC On Your Monitor
To enable G-SYNC on your monitor, you should first have both an NVIDIA GPU and a compatible monitor that supports G-SYNC, FreeSync, or AdaptiveSync.
Visit your monitor manufacturer’s official website and look for either FreeSync, FreeSync Compatible, G-SYNC, G-SYNC Compatible, or Adaptive-Sync.
Second thing you need is, of course, a game running within the monitor’s VRR range, for example, 48–144 Hz if you have a 144Hz refresh rate monitor.
Now, let’s dive in:
First, open your Nvidia Control Panel as you did on the previous settings, navigate to “Set up G-SYNC”.
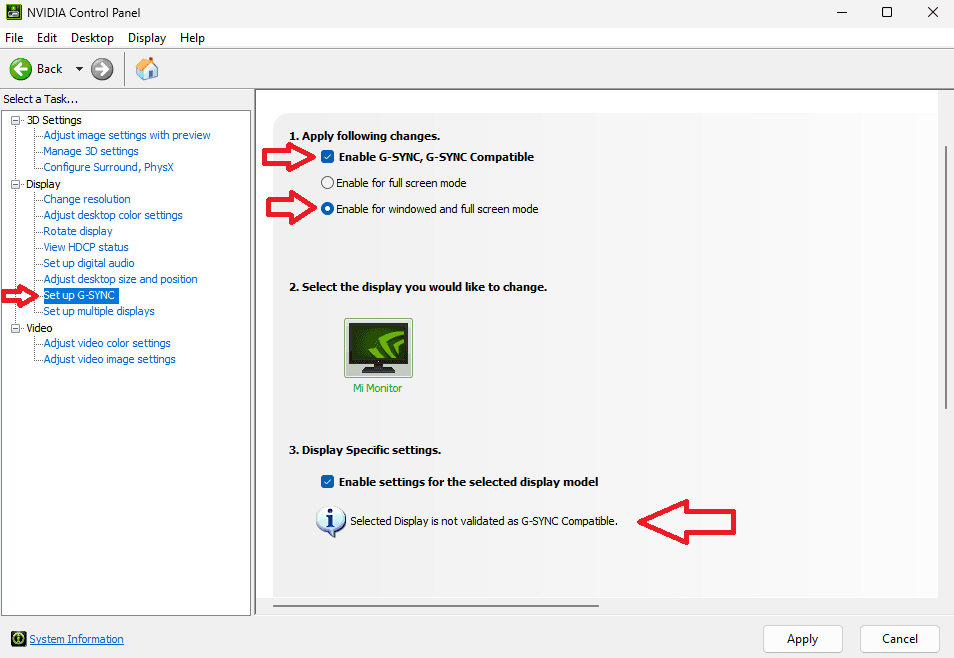
Next, check “Enable G-SYNC, G-SYNC Compatible” and select “Enable for windowed and full screen mode”.
Note that my selected display is not validated as G-SYNC compatible, but as long as it supports Adaptive-Sync (FreeSync), it can still work correctly with G-SYNC when manually enabled in the Nvidia Control Panel.
Second, navigate to “Manage 3D settings” and look for “Monitor Technology.”
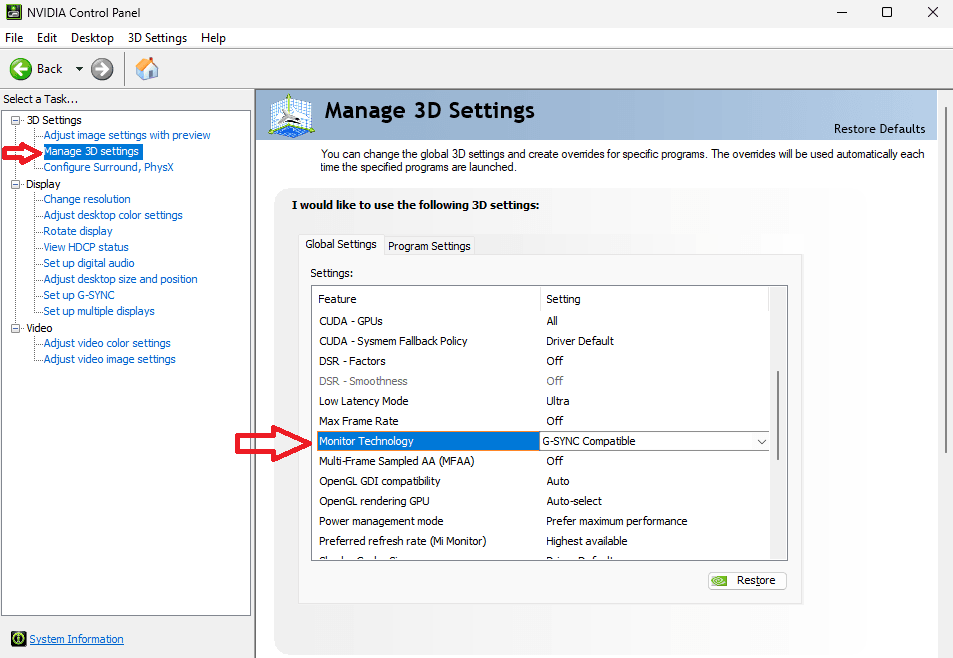
Next, click on the drop-down and select G-SYNC Compatible as I did, and click on “Apply”. That way, you ensured that your monitor will perform at its best and use VRR to give you the best experience possible.
In-Game Graphics Settings That Have the Biggest Impact on FPS
Windows, Nvidia Control Panel, and driver optimizations typically help in frame consistency and overall experience, resulting in a small FPS boost in your video game titles, while in-game graphics settings have a far greater impact on game performance.
Game-level settings that address hardware directly are more important than most system-level tweaks.
The biggest FPS gains usually come from adjusting in-game graphical settings correctly. These options directly control how much work your GPU and CPU must do every frame.
It is worth mentioning that your results may vary depending on your hardware and the specific video game.
To set up your in-game settings correctly, you must understand which settings are GPU-intensive, which are CPU-intensive, and which primarily affect visual quality rather than performance.
Understanding them makes you able to develop your own strategies, lowering specific settings which directly address a specific hardware. For instance, if you have a weak GPU, you can tweak in-game GPU-intensive settings and so forth.
Graphical Settings That Are CPU, GPU, or VRAM Intensive.
| Setting | Primary Impact | Notes / Tip |
|---|---|---|
| Resolution & Render Scale | GPU | Higher resolutions increase GPU load significantly; scaling down can greatly improve FPS. |
| Texture Quality | GPU / VRAM | Uses VRAM; high textures can cause stutter if VRAM runs out. |
| Shadows | GPU + CPU | Complex shadows are very demanding; can heavily impact FPS. |
| Reflections | GPU | GPU-intensive; real-time reflections can drop FPS significantly. |
| Post-Processing (Motion Blur, Bloom, Depth of Field, etc.) | GPU | Mostly affects visual quality; FPS impact varies by effect. |
| Anti-Aliasing (AA) | GPU | Smooths edges; performance cost depends on method (MSAA, FXAA, TAA). |
| Draw Distance / Level of Detail (LOD) | CPU + GPU | CPU handles object culling; GPU renders distant objects; reduces performance if maxed. |
| Physics / Destruction Effects | CPU | CPU-bound; can create stutter in simulation-heavy games. |
| Crowd / NPC Density | CPU | High NPC density increases AI processing, CPU-heavy. |
| Particle Effects | GPU | Effects like smoke, fire, and explosions are GPU-intensive. |
| V-Sync | Both | Synchronizes GPU frames with monitor; reduces tearing but may increase input lag. |
| Ambient Occlusion | GPU | Adds realistic shadows in crevices; visually noticeable but expensive. |
| Ray Tracing | GPU | Very GPU-heavy; massive FPS impact on non-RTX or mid-range GPUs. |
Resolution & Resolution Scaling
Resolution puts significantly more load on your GPU and VRAM, as it directly determines how many pixels your GPU must render each frame.
The bigger the resolution, the more pixels your GPU must generate and render. 1440p has 3,686,400 pixels (approximately 3.7 megapixels) while 4K has 8,294,400 pixels (approximately 8.3 megapixels), which means more than double the total pixels.
That’s the exact setting I set up correctly as a demonstration in my intro, the first image with 56 FPS was on 4K resolution, while the second image with 93 FPS was applying 1440p resolution, which is more suitable for my GPU’s raw power.
Since I have a 1440p monitor, I noticed minor improvements and changes to picture quality when using upscaled resolution techniques like DLSS. But generally, it’s not worth it to push your monitor’s limits to 4K because your monitor can’t render and show pixels more than it can support.
How to Optimize Resolution & Resolution Scaling?
If you’re struggling with low FPS, balancing resolution with your GPU’s capabilities is an effective solution. You may consider using resolution scaling (DLSS, FSR, XeSS, or in-game render scale) to give your video game a little boost in FPS.
To optimize your resolution, always set it to something your monitor supports and use DLSS if you have Nvidia GPUs or FSR if you have AMD GPUs, that way your rendered resolution will be less than what you set and your GPU will scale it to match your display’s resolution.
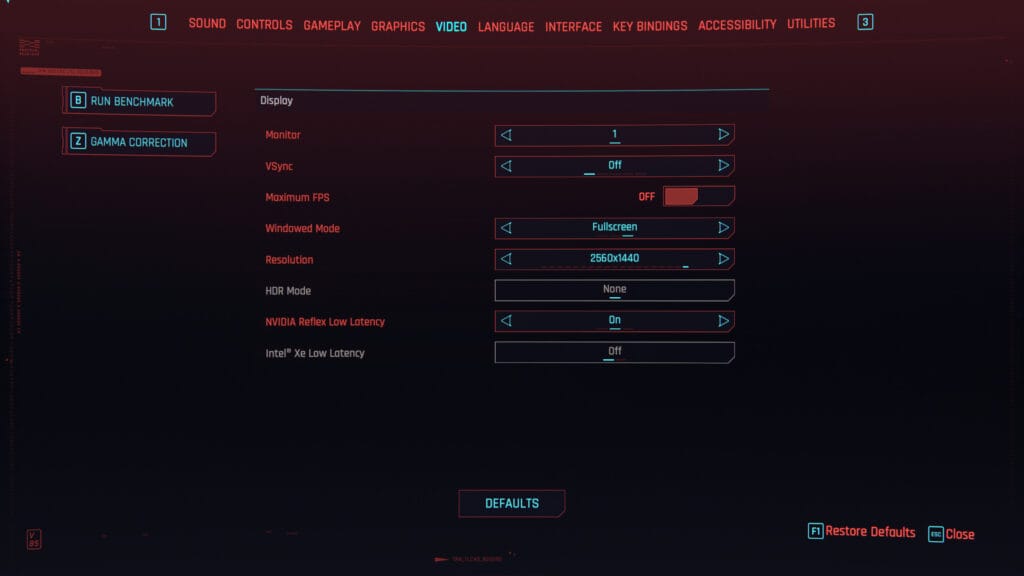
As you can see, I’m running the game at 1440p with Nvidia Reflex low latency enabled with DLSS enabled on “Quality”.
Texture Quality & VRAM Usage
If you have 8 GB of VRAM or less and you’re suffering from noticeable stutters, unbearable frame drops, or slow texture pop-ins. You should consider lowering your texture quality settings.
High texture quality allocates more VRAM (Video RAM) on your GPU. If it fills up, you will experience those performance issues as your game may need to stream textures from system memory (RAM) or storage.
Optimizing texture quality is about finding the right balance for your GPU, especially on mid-range GPUs with limited VRAM (8GB or less). Always keep an eye on VRAM usage when tweaking texture settings to find the sweet spot between performance and visual fidelity.
How to Optimize Texture Quality & VRAM Usage
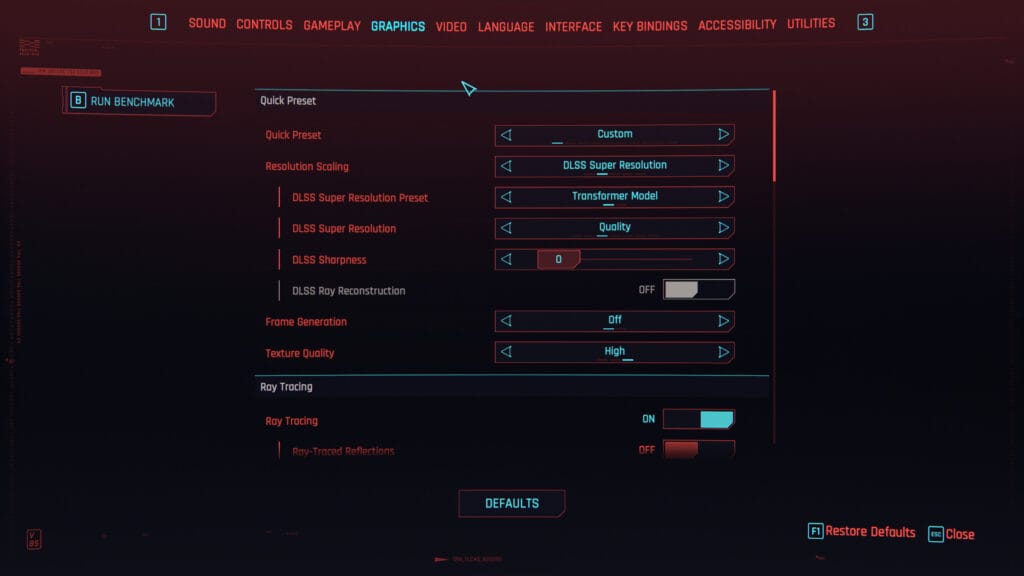
To optimize your texture quality settings, you must tweak them or consider lowering them depending on your GPU.
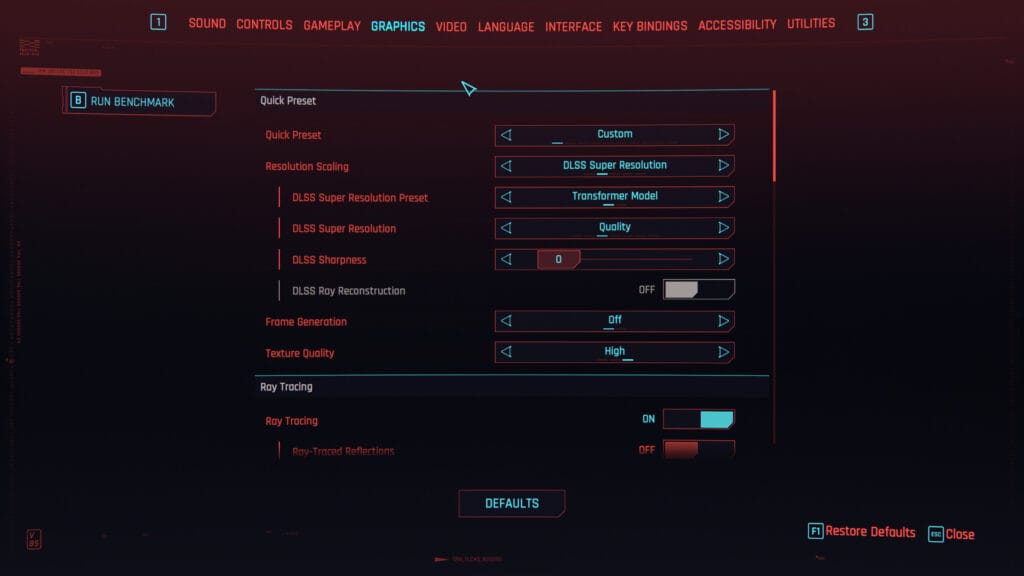
As you can see, I’m setting my texture quality on the “High” setting.
Shadows & Reflections
Shadows and reflections are two of the most GPU-intensive settings in modern games besides resolution.
Dynamic shadows, especially from multiple light sources, require a lot of raw GPU power to calculate complex lighting scenes for every frame.
Reflections, on the other hand, whether on water, mirrors, etc., will further overload your GPU because it often has to render the scene multiple times to simulate realistic reflections.
Optimizing shadows and reflections quality can lead to significant FPS boosts without drastically affecting the overall visual experience.
Those exact settings are usually more impactful on performance than minor post-processing effects like motion blur, ambient occlusion, depth of field, etc.
How to Optimize Shadows & Reflections
To optimize shadows & reflections settings, you must come up with a strategy, either tweaking them or considering lowering them depending on your GPU, from Ultra to High or Medium.
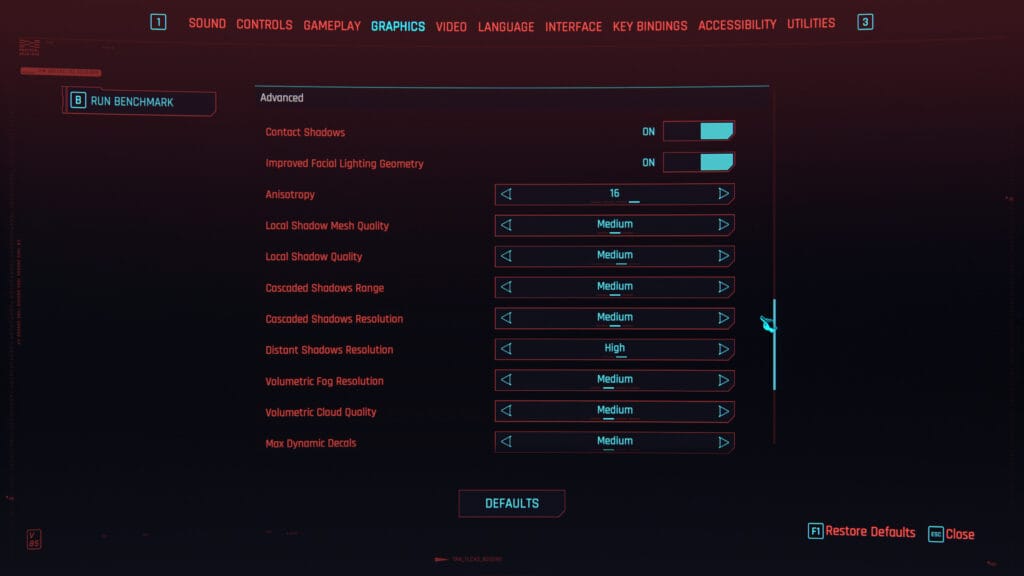
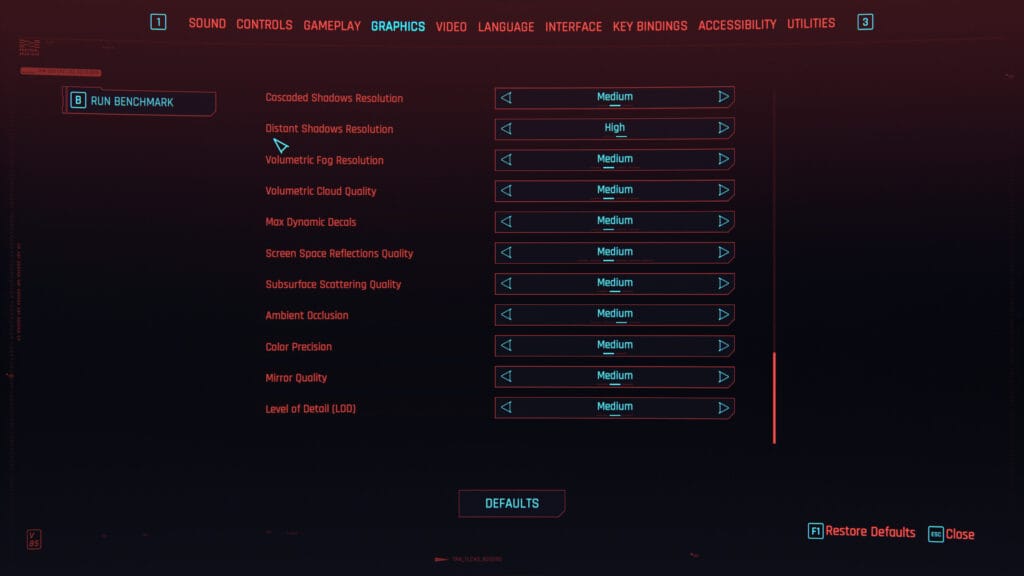
Those are my exact advanced graphical settings for Cyberpunk 2077.
Anti-Aliasing & Smoothing Options
Anti-aliasing (AA) is designed to reduce jagged edges, improving the image’s smoothness and overall fidelity. It comes with different methods and may have a noticeable impact on the game’s performance.
Because anti-aliasing interacts closely with resolution and scaling, it’s best optimized after setting your target resolution, which we talked about earlier. Choosing the right anti-aliasing method can significantly improve visual fidelity without unnecessary performance loss.
For a detailed breakdown of what anti-aliasing is, how different AA methods work, and which options offer the best performance-to-quality balance, see our full anti-aliasing guide here.
Conclusion
Optimizing your PC for gaming is about understanding where performance actually comes from.
System-level optimizations in Windows, drivers, and control panels can help improve stability and responsiveness, but the biggest performance gains and real FPS boosts almost always come from in-game graphics settings.
By focusing on and optimizing in-game options like resolution, texture quality, shadows, reflections, and frame synchronization, you can dramatically improve FPS, reduce stutter, and achieve smoother gameplay without sacrificing visual quality.
More importantly, aiming for stable and consistent frame times will result in a better gaming experience than simply targeting the highest possible FPS.
We know that every system is different, which is why optimization is always coming up with your own strategies, balancing between your hardware, your monitor, and the games you play.
Start with the settings that matter most, change one setting at a time, test changes gradually, keep an eye on real-time PC performance, and avoid over-tweaking.
When done correctly, PC optimization allows you to get the most out of your hardware and enjoy games the way they were meant to be played.
FAQ (Frequently Asked Questions)
Do you need a high-refresh-rate monitor to enable G-SYNC?
No. You can enable G-SYNC on a 60 Hz monitor as long as the display supports Adaptive-Sync / G-SYNC Compatible and your GPU supports it.
Why can G-SYNC still work when the monitor is “not validated”?
When NVIDIA Control Panel says “Selected display is not validated as G-SYNC compatible”, it simply means the display has not been officially tested and certified by NVIDIA. It does not mean G-SYNC won’t function.
Is stable FPS more important than high FPS?
Yes. Stable FPS with consistent frame times feels smoother and more responsive than higher but unstable FPS.
How do I know if I’m GPU-bound or CPU-bound?
If lowering resolution or graphics settings significantly improves FPS, you’re likely GPU-bound. If FPS stays the same regardless of resolution but drops in crowded or complex scenes, you’re more likely CPU-bound.
Do Ultra settings make games look much better?
In many cases, no. Ultra settings often have a high performance cost with minimal visual improvement during actual gameplay.